This is the multi-page printable view of this section. Click here to print.
Equipment
- 1: Internet
- 2: Utilities (Electricity & Water)
- 3: Hob
- 4: Oven
- 5: Microwave
- 6: Washer/Dryer
- 7: Dishwasher
- 8: TV & Sky
- 9: Heating
- 10: EV Charger
- 11: Fire Alarm
- 12: Devices/Manuals
1 - Internet
To access Wi-Fi-connection, connect to network named: TCGuest
The wireless passphrase is: WSNPRBCNDL
By connecting to the internet service, you agree not use the internet connection and the associated equipment in any way that:
- is unlawful, fraudulent or otherwise inappropriate, or has an unlawful, fraudulent or inappropriate purpose or effect, including, but not limited to, illegal file sharing or streaming;
- breaches any applicable local, national or international laws or regulations; or
- is unsafe or used otherwise than in accordance with applicable instructions, and safety and security procedures for the same.
Any person who uses the internet connection shall indemnify the owner for any losses resulting from any breach of these terms
The Wi-Fi service “TCGuest” is provided via the Unifi behind the TV. It is repeated as “TCGuest2” via a unit in the downstairs bedroom. You should therefore receive a good signal throughout the house . The router will show its status on the front screen, if you see any issues, please report a problem.
2 - Utilities (Electricity & Water)
Electricity
If you have problems with electricity, the fuse box is over the kitchen door. If the problem cannot be easily resolved, please do call the caretaker on the number shown in the contacts section.
Water
If you find that no water will come out of the tap, please check the Sure Stop by the front door. Make sure the switch is in the down position.
Equally, if you need to turn off the water because of a leak, just switch it to the up position.
The property does have a standard stop cock in the manhole outside the front door if needed.
3 - Hob
Control Panel
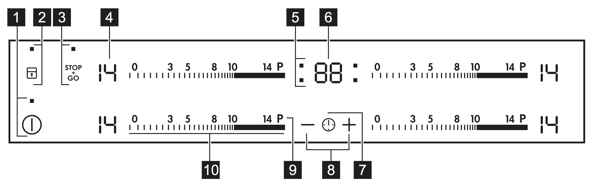
Use the sensor fields to operate the appliance. The displays, indicators and sounds tell which functions operate.
Heat settings
Lock
You can lock the control panel while cooking zones operate. It prevents an accidental change of the heat setting.
Set the heat setting first.
To activate the function: touch  .
.  comes on for 4 seconds. The Timer stays on.
To deactivate the function: touch . The previous heat setting comes on.
Child Safety
This function prevents an accidental operation of the hob.
To activate the function: activate the hob with  . Do not set the heat setting. Touch for 4 seconds. comes on. Deactivate the hob with .
To deactivate the function: activate the hob with . Do not set the heat setting. Touch for 4 seconds.  comes on. Deactivate the hob with .
To override the function for only one cooking time: activate the hob with . comes on. Touch for 4 seconds. Set the heat setting in 10 seconds. You can operate the hob. When you deactivate the hob with the function operates again.
4 - Oven
Oven Functions
Display
Buttons
Clock Functions

Setting the Time
You must set the time before you operate the oven.
The  flashes when you connect the appliance to the electrical supply, when there was a power cut or when the timer is not set.
Press the + or – to set the correct time.
After approximately five seconds, the flashing stops and the display shows the time of day you set.
To change the time of day press  again and again until starts to flash.
Setting the Duration
- Set an oven function and temperature.
- Press again and again until
 starts to flash.
 - Press + or – to set the Duration time.
- The display shows .
- When the time ends, flashes and an acoustic signal sounds. The appliance deactivates automatically.
- Press any button to stop the acoustic signal.
- Turn the knob for the oven functions and the knob for the temperature to the off position.
Setting the End
- Set an oven function and temperature.
- Press again and again until starts to
 flash.
 - Press + or – to set the End time.
- The display shows .
- When the time ends, flashes and an acoustic signal sounds. The appliance deactivates automatically.
- Press any button to stop the signal.
- Turn the knob for the oven functions and the knob for the temperature to the off position.
Setting the Time Delay
- Set an oven function and temperature.
- Press again and again until starts to flash.
- Press + or – to set the Duration.
- Press .
- Press + or – to set the End time.
- Press to confirm.
- Appliance turns on automatically later on, works for the set DURATION time and stops at the set END time. At the set time an acoustic signal sounds.
Setting the Timer
- Press again and again until
 starts to flash.
 - Press + or – to set the Timer.
- The Timer starts automatically after 5 seconds.
- When the set time ends, an acoustic signal sounds. Press any button to stop the acoustic signal.
- Turn the knob for the oven functions and the knob for the temperature to the off position.
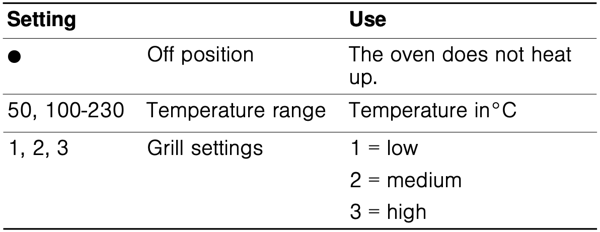
5 - Microwave
Control Panel
Buttons
You can use the buttons to set various functions. On the display, you can read the values that you have set.
Function selector
Use the function selector to set the type of heating.
Temperature selector
The temperature selector is used to set the temperature or grill setting.
6 - Washer/Dryer
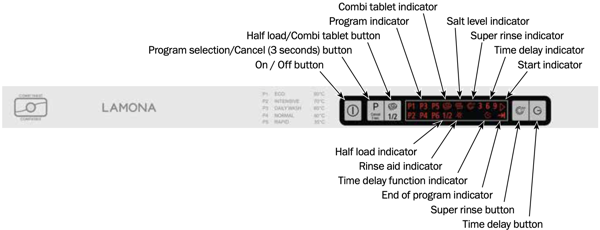
Control Panel
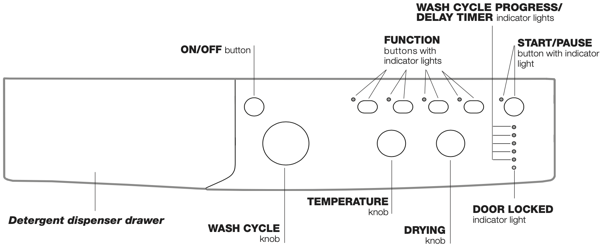
Detergent dispenser drawer: used to dispense detergents and washing additives.
ON/OFF button: switches the washer-dryer on and off.
WASH CYCLE knob: programmes the wash cycles. During the wash cycle, the knob does not move.
FUNCTION buttons with indicator light: used to select the available functions. The indicator light corresponding to the selected function will remain lit.
TEMPERATURE knob: sets the temperature or the cold wash cycle.
DRYING knob: used to set the desired drying programme.
WASH CYCLE PROGRESS/DELAY TIMER indicator lights: used to monitor the progress of the wash cycle. The illuminated indicator light shows which phase is in progress. If the Delay Timer function has been set, the time remaining until the wash cycle starts will be indicated
DOOR LOCKED indicator light: indicates whether the door may be opened or not.
START/PAUSE button with indicator light: starts or temporarily interrupts the wash cycles.
N.B. To pause the wash cycle in progress, press this button; the corresponding indicator light will flash orange, while the indicator light for the current wash cycle phase will remain lit in a fixed manner. If the DOOR LOCKED indicator light is switched off, the door may be opened.
To start the wash cycle from the point at which it was interrupted, press this button again.
Standby mode: This washing machine, in compliance with new energy saving regulations, is fitted with an automatic standby system which is enabled after a few minutes if no activity is detected. Press the ON-OFF button briefly and wait for the machine to start up again.
Indicator lights
The indicator lights provide important information. This is what they can tell you:
Delayed start
If the DELAY TIMER function has been activated, after the wash cycle has been started the indicator light corresponding to the selected delay period will begin to flash:
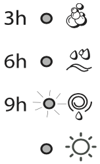
As time passes, the remaining delay will be displayed and the corresponding indicator light will flash:
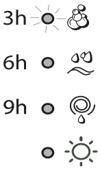
The set programme will start once the selected time delay has expired.
Wash cycle phase indicator lights
Once the desired wash cycle has been selected and has begun, the indicator lights switch on one by one to indicate which phase of the cycle is currently in progress.

Note: when the drying cycle has finished, the DRYING knob should be returned to the “0” position.
Function buttons and corresponding indicator lights
When a function is selected, the corresponding indicator light will illuminate.
If the selected function is not compatible with the programmed wash cycle, the corresponding indicator light will flash and the function will not be activated.
If the selected function is not compatible with another function which has been selected previously, the indicator light corresponding to the first function selected will flash and only the second function will be activated; the indicator light corresponding to the enabled option will remain lit.
 Door locked indicator light
When the indicator light is on, the porthole door is locked to prevent it from being opened; make sure the indicator light is off before opening the door (wait approximately 3 minutes). To open the door during a running wash cycle, press the START/PAUSE button; the door may be opened once the DOOR LOCKED indicator light turns off.
! Fast flashing of the “programme phases” and DOOR LOCKED indicator lights indicate an anomaly
Wash cycle phase indicator lights/ins>
- Switch the washer-dryer on by pressing the ON/OFF button. All indicator lights will switch on for a few seconds, then they will switch off and the START/PAUSE indicator light will pulse.
- Load the laundry and close the door.
- Set the WASH CYCLE knob to the desired programme.
- Set the washing temperature.
- Set the drying cycle if necessary.
- Measure out the detergent and washing additives.
- Select the desired functions.
- Start the wash cycle by pressing the START/PAUSE button and the corresponding indicator light will remain lit in a fixed manner, in green. To cancel the set wash cycle, pause the machine by pressing the START/PAUSE button and select a new cycle.
- At the end of the wash cycle the indicator light will switch on. The door can be opened once the DOOR LOCKED indicator light turns off. Take out your laundry and leave the appliance door ajar to make sure the drum dries completely. Switch the washer-dryer off by pressing the ON/OFF button.
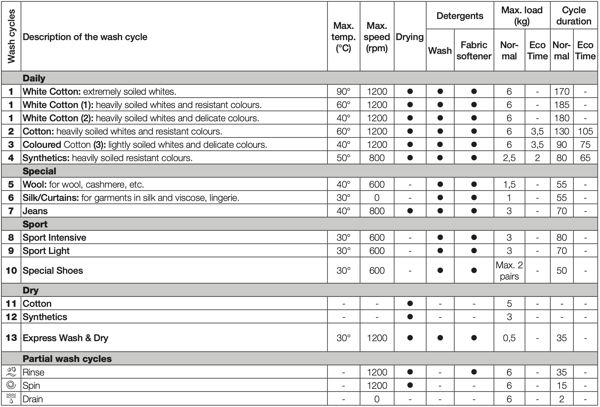
Specials wash cycles
Sport Intensive (wash cycle 8) is for washing lightly soiled sports clothing fabrics (tracksuits, shorts, etc.); for best results, we recommend not exceeding the maximum load indicated in the “Table of wash cycles”. We recommend using a liquid detergent and dosage suitable for a half-load.
Sport Light (wash cycle 9) is for washing lightly soiled sports clothing fabrics (tracksuits, shorts, etc.); for best results, we recommend not exceeding the maximum load indicated in the “Table of wash cycles”. We recommend using a liquid detergent and dosage suitable for a half-load.
Sport Shoes (wash cycle 10) is for washing sports shoes; for best results, do not wash more than 2 pairs simultaneously.
Express Wash & Dry (wash cycle 13) was designed to wash and dry lightly soiled garments quickly. This cycle may be used to wash and dry a laundry load of up to 0.5 kg in just 35 minutes.
To achieve optimum results, use liquid detergent and pre-treat cuffs, collars and stains.
Personalisation
Setting the temperature - Turn the TEMPERATURE knob to set the wash temperature (see Table of wash cycles). The temperature may be lowered, or even set to a cold wash. The washer-dryer will automatically prevent you from selecting a temperature which is higher than the maximum value set for each wash cycle.
Setting the drying cycle - Turn the DRYING knob to select the desired drying option. There are two options:
- Based on time: From 40 minutes to 180.
- Based on the desired laundry dryness level:
- Iron dry: suitable for clothes which will need ironing afterwards. the remaining dampness softens creases, making them easier to remove.
- Hanger dry: ideal for clothes which do not need to be dried fully.
- Cupboard dry suitable for laundry which can be put back in a cupboard without being ironed.
If your laundry load to be washed and dried is much greater than the maximum stated load (see adjacent table), perform the wash cycle, and when the cycle is complete, divide the garments into groups and put some of them back in the drum. At this point, follow the instructions provided for a “Drying only” cycle. Repeat this procedure for the remainder of the load.
Table of Drying times (guideline values)
| Fabric type | Load type | Max. load (kg) | Cupboard dry | Hanger dry | Iron dry |
|---|---|---|---|---|---|
| Cotton | Clothing of different sizes, Terry towels | 5 | 180 | 170 | 140 |
| Synthetics | Sheets, Shirts, Pyjamas, socks, etc. | 3 | 140 | 120 | 100 |
Drying only
Use the cycle selector knob to select a drying cycle (11-12-13) in accordance with the type of fabric. The desired drying level or time may also be set using the DRYING knob.
Functions
The various wash functions available with this washer-dryer will help to achieve the desired results, every time. To activate the functions:
- Press the button corresponding to the desired function;
- the function is enabled when the corresponding indicator light is illuminated.
Note: If the indicator light flashes rapidly, this signals that this particular function may not be selected in conjunction with the selected wash cycle.
Eco Time - Selecting this option enables you to suitably adjust drum rotation, temperature and water to a reduced load of lightly soiled cotton and synthetic fabrics (refer to the “Table of wash cycles”). Eco Time enables you to wash in less time thereby saving water and electricity. We suggest using a liquid detergent suitably measured out to the load quantity.
! This function may not be used in conjunction with wash cycles 1, 5, 6, 7, 8, 9, 10, 11, 12, 13,  ,
,  ,
,  .
.
1200-600 - Press this button to reduce the spin speed
! This function may not be used in conjunction with wash cycles 6, 11, 12, 13, .
 Intensive Wash - Because a greater quantity of water is used in the initial phase of the cycle, and because of the increased cycle duration, this function offers a high-performance wash.
! This function may not be used in conjunction with wash cycles 5, 6, 7, 8, 9, 10, 11, 12, 13, , , .
 Delay timer - This timer delays the start time of the wash cycle by up to 9 hours. Press the button repeatedly until the indicator light corresponding to the desired delay time switches on. The fifth time the button is pressed, the function will be disabled. N.B. Once the START/PAUSE button has been pressed, the delay time can only be modified by decreasing it until launching the set programme.
! This option is enabled with all programmes.
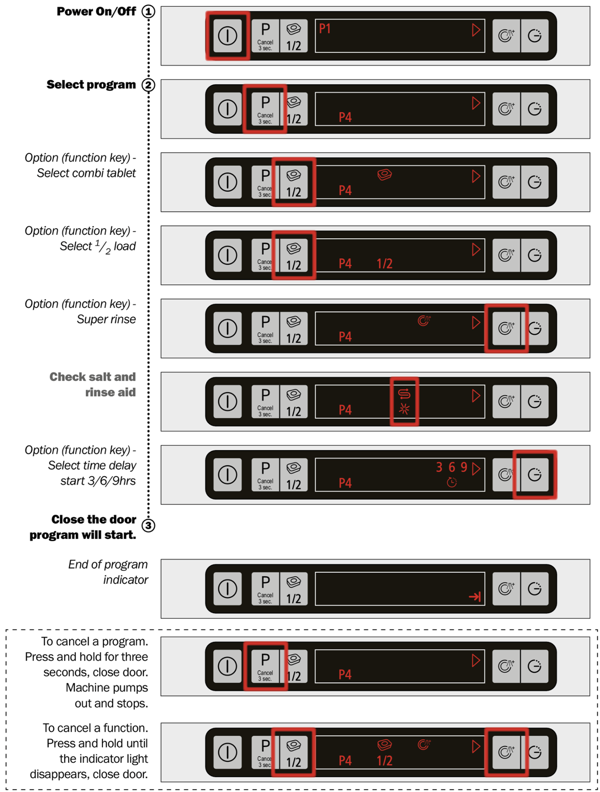
7 - Dishwasher
Controls
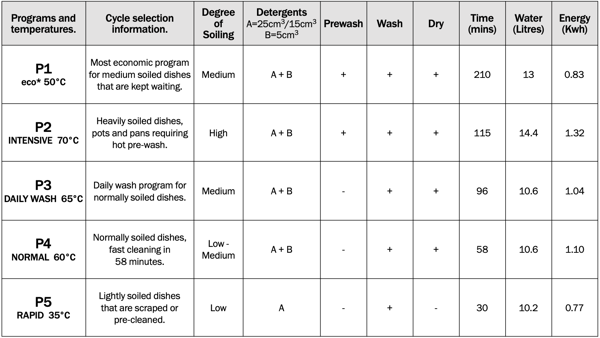
Maximum plate size:
- Upper basket – 25cm
- Lower basket – 31 cm
8 - TV & Sky
Controls
The remote controls provided are as follows:
- TV - Samsung standard remote
- TV - Samsung smart remote
- Soundbar - Samsung remote
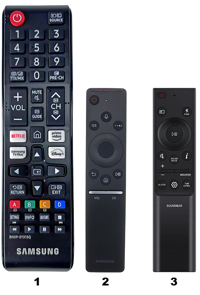
- One HDMI cable should be plugged into the soundbar and into the HDMI 2 (eARC) port on the back of the TV.
- One of the two cables from the window should be connected to the Satellite input on the TV.
Sky
Sky channels are available via the Now TV app on the TV
9 - Heating
The heating for the house is controlled via the Nest controller which is normally in the living room.
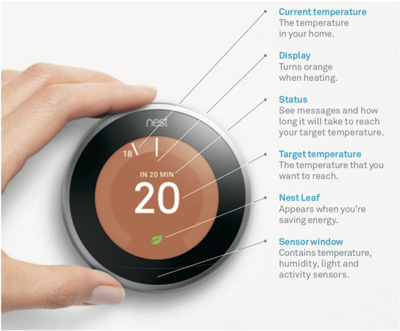
As you walk up to the controller it will show you the current temperature. Turn the ring to adjust the target temperature. Press the ring and turn to control hot water.
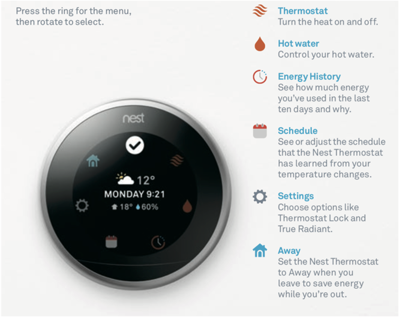
Feel free to adjust the temperature to your liking. Because of the open stairway, the upstairs rooms do get warmer than the downstairs rooms, consequently the upstairs radiators are turned down low and the downstairs ones are turned up high.
In case there is any problem with the controller, you can manually override by pressing the button in the centre of the box to the left of the boiler.
10 - EV Charger
The EV charger is a Sevadis Maxicharger - 7.4kW, Type 2. It is untethered, so you will need to have your own cable.
The EV Charger is located on the workshop wall in the yard. Services for it are provided via Monta. In order to use the charger you must register on their website (https://monta.com ) and install the Monta app.
Once registered you should request a join code from the property owners via email or text. You should have already received a message from Clare or Roger, so you should be able to contact them. If you have requested EV Charger access as part of your booking, you should receive the join code as part of your welcome email from Clare and Roger (which is separate to the emails you receive from the booking company).
Please follow the guide here in order to use the join code - https://monta.com/uk/help-center/join-a-team-using-a-code-app/ . You should be automatically accepted into the Ty’r Celyn team and have access to the charger.
To start a charge please follow this guide - https://monta.com/uk/help-center/start-charge-team-charge-point-app/ .
We have tried to keep the charge as low as possible to cover our electricity costs and the charges for the Monta service.
If you have any queries, please reach out to us or alternatively if you are having problems with the app you can ask for assistance using the Support options in the Me menu of the app.
Start Charging
Caution - During the charge session, do not disconnect the charging handle. There is a risk of damage to the cradle of the charger or the connector of your EV.
- Insert your charging handle into the charge port on your EV and the charger socket outlet.
- Use the Monta app to initiate a charging session
Note - Ensure your EV is charging. The charging LED on the charger should be flashing green. If you suspect the vehicle is not charging properly, try reconnecting the charge cable or contact the local dealer for support.
Stop Charging
Note - If you disconnect the EV charge cable during the charge session, the charger automatically disconnects the power supply. This stops all charging operations.
- To stop charging, you can choose either of the following two ways:
- Wait for the charge session to end and no further actions are required in the case of scheduled charging or plug-and-charge.
- The charging LED will light solid green.
- The Charge app displays that your vehicle is fully charged.
- Stop the charge using the Monta app
Note - When your vehicle is fully charged, the charger will automatically disconnect the power supply.
- Remove the charging handle from the charger socket outlet and the EV charge port.
11 - Fire Alarm
The fire alarm system installed throughout the cottage is and Aico 3000 series alarm system. It provides smoke and heat alarms for fire detection as well as a CO alarm in the utility room. In the event of an alarm, all sirens will sound.
When the alarm system sounds
If there is a fire, immediately evacuate the premises and telephone the fire brigade.
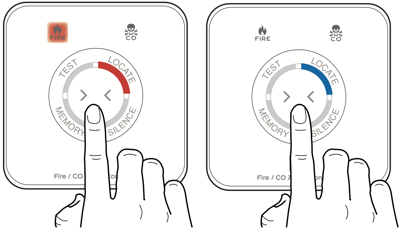
If the source of the alarm is not obvious and only if safe to do so, go to the Alarm Controller and check to see which indicator is illuminated, Fire or CO.
If the CO indicator is illuminated, open doors and windows while evacuating the premises. Contact the appropriate authorities to report the incident.

Locate the source Alarm
If the FIRE indicator is illuminated and there is no obvious fire, press the button. The LOCATE segment will change from red to blue.
After a 10 to 40 seconds period, all the Alarms in the system will stop sounding except the source Alarm(s).
Silence the source Alarm
If you are satisfied there is no fire but the Smoke/ Heat Alarm is still continuing to alarm you may now silence the system. Wait until the SILENCE segment is flashing red and then press the button. The SILENCE segment will turn blue, after a delay the Alarm(s) will stop sounding and all segments on the controller will flash green momentarily to indicate that the Alarm Controller is back in standby.
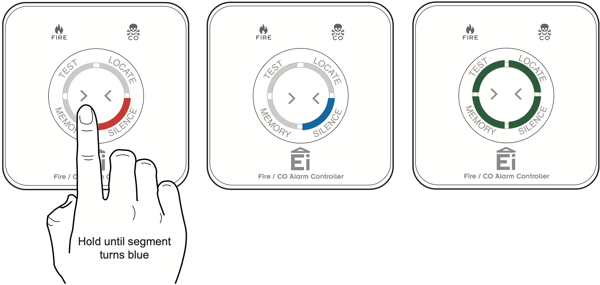
For safety reasons, it is not possible to silence CO events remotely.
12 - Devices/Manuals
Device Manuals
- Hob – AEG HK654200FB – Link
- Oven – AEG BES351010M – Link
- Combi-Microwave Oven – BOSCH HBC84H501B – Link
- Extractor Fan – Neff D87ER22N0B – Link
- Washer/Dryer – Indesit IWDC 65125 – Link
- Dishwasher – Lamona LAM8302 – Link
- Fridge – Lamona HJA6132 – Link
- Iron – Morphy Richards Breeze
- Toaster – Morphy Richards Prism 4 slice
- Kettle – Morphy Richards Prism
- TV – Samsung QE43Q60DAUXXU – Overview / Guide / Remote
- Soundbar - Samsung S60D - Link
- Heating – Nest Gen 3 T3010GB
- Alarm/Radio – JVC RA-D77M
- EV Charger - Sevadis Maxicharger 7.4kW Untethered - Charger / App
- Fire Alarm - Aico 3000 - Link